


Both plate spinning clowns were made from the left over bits of lime wood from carving Joey & Judy.

By jumbling up the parts (a bit like a police photofit) new characters can be made from otherwise wasted wood.


I had a rummage in my fabric boxes to find a pallet of colours and prints to work with both clowns.


I always like the inside of the puppet body to match some part of the external costume. I had lots of this dress fabric to work with.


Nice to have both the glove bodies completed together .
Both puppets can now be built in tandem as a 'set'.

The Front panel gets all the extra treatment, while the back although still charming is left relatively plain.

Having made these parts, I can alter the initial sketch on my iPad using procreate. This gives a better idea of how the puppet will look.


This is my method for making necks for wooden heads. I never throw out scraps of plywood, however small, they get put in the 'Neck' box.
Scraps of ply are drilled with two 22mm holes, then the hole is finished on the bandsaw before gluing a stack of them together.


At the moment we only have a neck and a 'mask' of a face.
Being made of leftovers, this face is particularly flat and mask like.
The face is solid wood , so quite heavy. Before joining it to the neck it must first be hollowed out a bit.
Drilling out with a spade bit gets rid of quite a lot of wood.
The Black & Decker profile sander gets rid of the rest.
Face joined to neck and layers of plywood used to build up the thickness of the sides. This makes for a nicely hollow head.

Cardboard and electrical tape makes a cone shape for the Fez.
Thin plywood gives a support on which to build the back the head.

Nice to try on the ruff to see how the finished puppet might look.

Aluminium foil bulks out the back without adding much weight.
Paper pulp fills in the jigsaw puzzle cracks and also bonds the face more strongly to the neck.


Time to whizz up another batch of Paper Pulp.

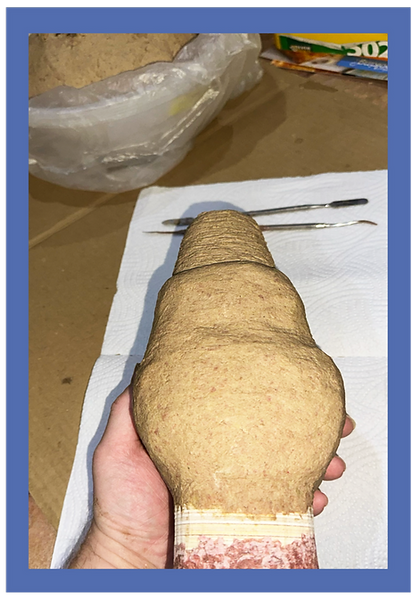
Pulping over the Fez former and the foil on the back of the head.
Painting inside the neck. The colour always compliments the fabrics that line the glove body.
That way when it hangs up in the theatre, looking inside the puppet, everything matches beautifully.


The head is fixed onto the body with PVA glue and a tight binding of strong carpet thread. Once that has dried I cover over with a layer of cotton fabric to make the neck smooth for painting.
PVA and fabric is bound over the arm stumps to make them solid and strong enough to take wooden arms.


The hands are very simple shapes, not intricate like my 'regular' hands.
These are specifically designed to hold the plate spinning sticks.

The 'arm' part of the hand are cut to exactly fit onto the hard arm stamps of the puppet glove body.
Hot glue is used to fix the arms to the body. This is only to position them.
Cloth and PVA glue will be bound over to make the whole this secure.
When I put his arms up like this, he made me think of Edvard Muncs 'The Scream'.


When I put his arms up like this, he made me think
of Edvard Muncs
'The Scream'.
With Spring in the air, it's so nice to finally be able to work outdoors again.


Another nice Spring day, so it was a pleasure to be painting outdoors in the sunshine.

Pom pom hair secured in place. Just trying on bits of the costume for fun.

Seeing how they will look together.
Padding on the tummy and shoulders has two functions.
It gives the puppet a more balanced shape, but it also gives an easy, soft area onto which the next stages of the costume can be sewn.


I have decided to deviate from my design, both in the fabrics and the type of sleeves.

Rather than a sleeve with tight cuffs, I am now going for a big loose sleeve over the top of an unseen shirt like undergarment.
In a change to the design, this bright stripey fabric becomes the new undergarment sleeves.
I will often cut garments freehand. But being lined in a different fabric. these sleeves were fiddly, so this time I used a pattern.
Gingham on the outside and spots as the lining, with trim that matches his big clowns ruff.

Once the sleeves are done the rest of the tunic can be added.

The decorative panels cover all the unsightly joins front and back.

His little fez and ruff complete the puppet. Welcome Droopy Dropsy!


One of many new puppets for my 20th season: I'm looking forward to getting him spinning plates up at the Heights of Abraham this Summer.


