


ELPHABA
Defying Gravity


Photos from the internet of Cynthia Erivo as Sculpting reference. Even the official merchandise doll is a useful resource as it captures a clear essence of the face.

This is not a puppet to carve in wood : Pulp is the only way to go.
The complex hat shape and the fine braids of her hair mean Pulp is the right choice.
A cardboard and tin foil core get the process started quickly. I really don't have time to be making her at all. So working super fast is the order of the day !

A longer than usual glove body. Also the D-Ring and catch strap need to be hidden.
The reason of this will become apparent later. This puppet has to defy gravity.

As always, the inside of my puppets get made nice and neatly long before the outside is even a consideration. I'm very pleased with the results here.

Big thanks to fellow puppet maker Joe Burns, who found these behind the scenes pictures of Cynthias wig.


First batch of experimental braids. Wool and very fine butchers string. I will try painting these.


This nesting box for small garden birds was in my local charity shop.
I saw right away that the straw on the roof would be perfect for making the broomstick bristles.
Time consuming work, but I picked through each blade of straw to pick out the flexible ones that wouldn't snap or crack.
Then I tied together little bundles of the the best 'twigs'.


Once the head had dried out, the back is sliced off on the bandsaw.
All the core cardboard, paper and foil is removed to give a nice hollow head.
Part of the neck tube was sliced off and added inside the head and joined with pulp.


This is the means by which Elphaba can be hoisted outside the Proscenium Arch to 'fly'.
The spear like shape of the control rod locates into the matching groove now inside the puppet neck. This is so she doesn't spin on the stick, but stays facing the right way.
Notches in the wood giving extra key in areas. Pulp strengthens the whole joint.

Her hat is practically a character all on its own.
It needs to be totally 'right' and instantly recognisable.
It really is the crowning glory of her outfit.


Back to the internet for a couple of reference shots of the iconic hat.

The hat was why this puppet absolutely had to be made out of paper Pulp.


The core was very light, thin card because it will stay buried under the Pulp.

Pulp is such a wonderfully versatile medium to work in.
Some more reference shots of the astoundingly talented Cynthia Erivo.
I first became aware of her brilliance with the movie "Bad Times at the El Royale"
The Internet provides 'Six Degrees of Separation' to anyone in the World, so maybe Cynthia might eventually get shown a photo of my finished puppet.
If so, I hope she likes the result.

A hearty breakfast before starting sculpting.

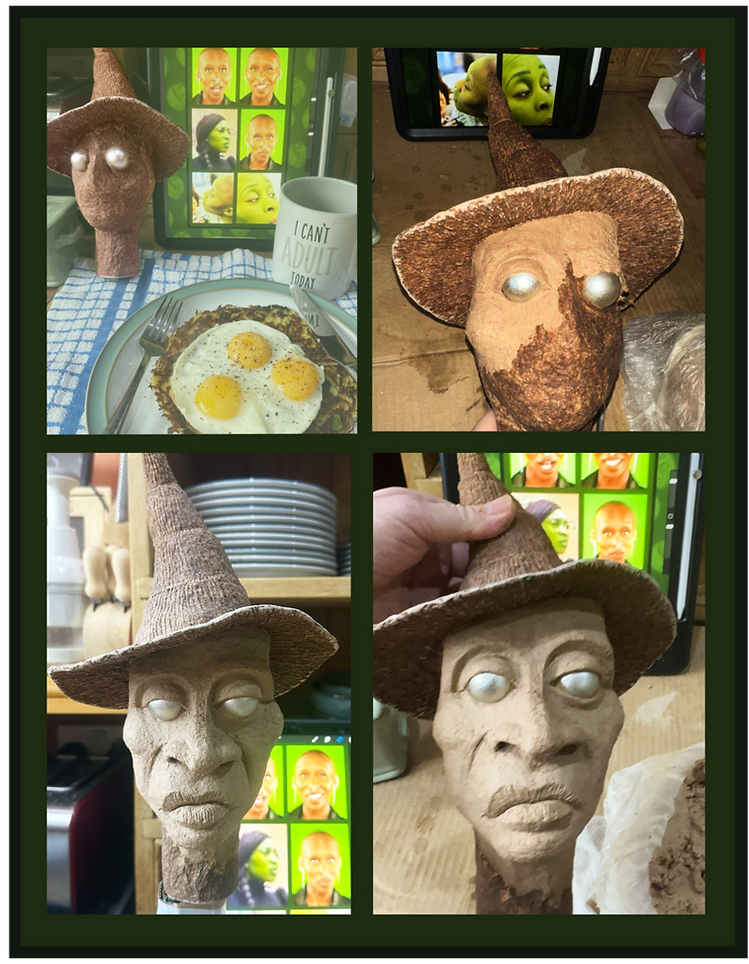
Once this layer has dried I can build out her cheeks to soften her outline a tad.


Meantime I can concentrate on her hair braids and broomstick parts.
The plywood heart of the broom conceals a slit to take a metal bracket. There are also two strong magnets embedded in the slit to stop the broom falling off its holder.


Unwound natural twine is put over this base with PVA glue. This will both strengthen the joins and also provide a good background to take the real bristles.


Both the broomstick and the head drying out side by side on the radiator.
The next phase is making her hair, including a 'hole' where the wool braids can be inserted.
Aluminium foil is used to bulk out the bigger areas.
This both keeps the weight down and also uses less valuable Pulp.

The hair braids will need a coat of brown paint to make them the right colour and also to stiffen them.
Checking all the braids will actually fit into the hole in the false hair bun.


I'm happy with how the hair is working.
But sadly, with the hair in place, her hat now looks small and 'tight' on her head.
Making the hat look the right size isn't too hard as fortunately Pulp is easy to cut and replace.


Pulp adhering to itself so well is what allows any of my heads to be built up in layers. This is the final sculpt layer for Elphaba. I am very happy with it.


The straw bundles from the bird house now get a covering of PVA glue to strengthen them. Also test some of the hair braids by using brown acrylic paint on them.


These are now trimmed and glued to the broom base.
A couple of layers of the bristles are enough to flesh out the broom to a good size.
The movie is so 'popular' that kids will really know exactly how the movie broom looks in profile.

So I use a little bit of Pulp to complete the right silhouette.
First though, the inside of the neck is painted green and varnished to match the inner glove.
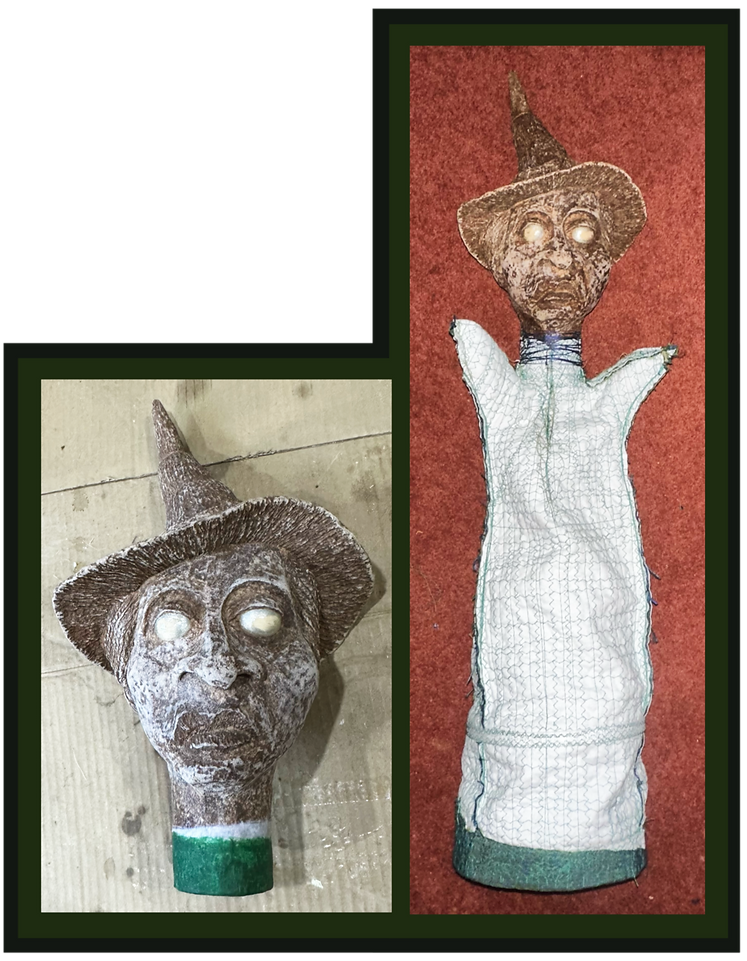
Time to join the head to the body.
For me, this is where the head sculpt stops being just an 'art project' and becomes an actual puppet.
First though, the inside of the neck is painted green and varnished so that it blends neatly with the puppets inner body.
Hair braids are dyed and painted now, and still fit the hole in her head.


Checking out different costume reference shots, it's hard to make out exactly what the movie dress is made of for the Defying Gravity sequence.
The dress I make for my puppet version needs to be a blend of all her black dresses in the first film.
The movie dresses all have a lot of texture, black on black.
So I decided to fabricate my own by using appliqué of different fabrics and lace.
Arm stumps are stuffed full with plastic carrier bags to plump them out.
PVA wood glue and carpet thread is bound around the arm stumps to make them firm enough ti take the wooden hands ... but still soft enough to perform.

Extra work, but in the sunlight up at Heights of Abraham the dress will stand out against her totally black cloak.

To save time, I am pulling out a part finished left hand that ironically was for a Wizard puppet. He also holds a stick in his right hand.
But Elphaba needs the hand right now.


I can't carve her other hand until both the broomstick and her are on a tailored stand.
When they are both in position , I can make the hand and arm span the gap perfectly.

Time to plan how the routine will work inside the theatre, and build accordingly.

Extending the stick that locks inside her skull to become a body-length stand.
The broomstick already has a slot built in , this locates over the metal angle bracket.
This stand is bulky, but it does ensure both the puppet and the broom are always in exactly the same position relative to each other.

So now the wooden hand is made to join the two together for flying.


The top of her hat brim was very flat, it just needed another layer of Pulp with some texture to match the rest of the hat when painted.

The hand I pinched from an unfinished wizard puppet was, well 'unfinished' too...
The left hand also got a little bit of Pulp to give it a more pleasing shape.
At last ! The fun part. A coat of paint.


Once the varnish had dried, cuffs and sleeves are then assembled over her arms.
Her collar is added as separate element to the dress. I find it easier to get a tidy fit round the puppets neck this way,

Basic black dress completed.
The cloak will cover a lot of this, so much of it will never be seen by the audience.
The back of the dress will certainly never be seen. But has to be there all the same.
I made a leather satchel with scraps and straps. I didn't have a metal buckle the right size, so I will have to do a paint job on this blue plastic part.
In the movie, Glinda grabs a big bit of black cloth, shakes the dust of and ties it loosely around Elphabas neck ... and voila a cloak !

So this was virtually how I made the puppets cloak.
I'd been lucky to find a plain black dress in the local charity shop that was a lovely texture and thin enough to move well on stage.
It needed little more than hemming and tying round her neck.
Of course it then needed sewing firmly in position so it doesn't fall off.
This made a lovely billowing and floaty cloak.

The puppet / broomstick / control rigg are only half of this project.
For the final moments of the routine there is more spectacle to come.
When Elphaba is extended farthest out of the proscenium arch, I want the Emerald City to be seen 'below' her as she flies.


This Im planning to do as an 'aplice' picture in fabrics attached to the end of her super long cloak.


Layering organza over other shimmery fabrics to make the towers.


The finished ensemble , being shown off at our Bognor Regis Puppet Festival in September 2025.

