


BONKO the CLOWN


The first rough sketch bears little resemblance to the finished puppet.
But it was good enough to get the ball rolling.
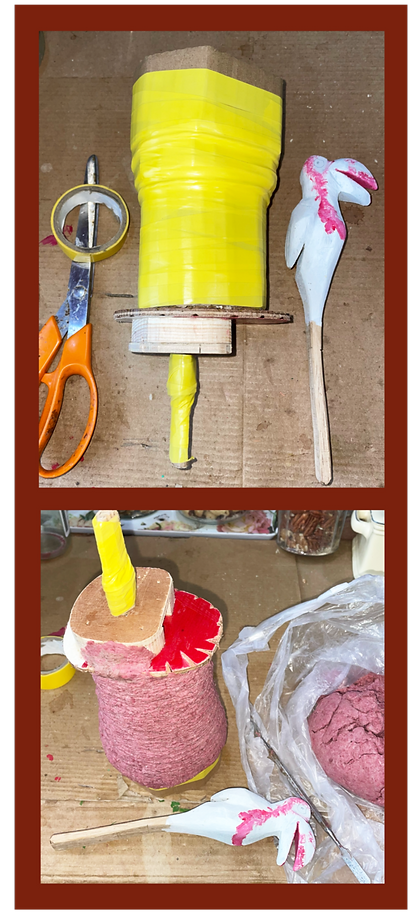
With the little Toucan cut out of Lime wood, I can set about creating a hat cavity wide enough for him to hide inside.
The hat cavity extends down inside where the puppets head will eventually be.
This will let out little birdie be fully hidden.
Electrical insulation tape covers the cardboard former. The tape prevents the pulp sticking to the cardboard.
A shoulder and neck section is likewise covered in tape then pulped over.


Once hardened the two parts are joined together with a ball of tin foil bulking out where the head will be. Electric tape again ensures the foil can be easily removed.


Pulp ears are made over tin foil formers. And the head is cut open and all the excess tin foil and tape excavated from the inside.

The now hollow parts are tacked together with blobs of hot glue , likewise the ears are put in place with hot glue. The next layer of Pulp will cover all joins and make it all super strong.

He almost resembles a monkey at this point.
I think we are familiar with the stereotype mechanical monkey automata that band a pair of cymbals together.
But because this guy is banging a drum (on his face) I resisted the urge to change him into a monkey at this point and stayed true to him being a Clown.

A wooden centre is hot glued into place, a dowel lined up right through horizontally. Flat end sections of plywood are tacked into place also with hot glue.
These need to be vertical and flat to allow for the arm mechanism to work smoothly.
As always the hot glue is only to position things : a layer of Pulp is the permenant fixing.


A hat is not really a hat without a brim !


Cheers to Damien Weiss in France for such a lovely way to make legs and feet.

I probably wouldn't use it to make legs for say a Mr.Punch, but for puppets like Bono this is a really fast easy method.


Fully assembled lower section. he does not need 'thighs' as the thick trouser material will create the illusion of the shape of upper legs.

However I can see that when the two parts are put together, I will need to give him a taller torso if I am going to give the drum enough movement.

The gravity pull mechanism to control the drum. The little plywood panels will become upper arms to affix the drum to.
A few final details in Paper Pulp just tp sharpen up his look.


He now has extra height in his torso, thanks to some simple plywood 'risers'.

A Christmas shortbread tin is the perfect size for his drum.
Stong metal wire is passed through holes in the tin.
These have two functions.

The main purpose of the wire is to give a very strong join for his hands.
The secondary job of the wire is to take noisy beads and bells to give the drum extra sound when banged.

The hands are hollow so they can be slid over the support wires. Car Body Filler (P38) was used to bond the hands over the Pulp 'stumps' on the drum.

He has been such a complex build so far, that it's very nice to get back to simple costume making. Here the sleeves are taking shape.


His hat will be painted and glittered, but it will also have a big fabric and pom-pom flower.

His hat and shoes will be same glittery red. this all ties in with the Heights of Abraham 2024 "Ruby & Gold" theming for the Summer.

Painting on his permanently dizzy, concussed expression.
If you kept bashing yourself on the nose with a heavy drum - you'd look like this too !


Once the drum and arms are glued and pinned in place, some extra padding is taped over the joint to plump out the fabric sleeves.


Some purely decorative additions :
Pom-Pom elbow trims and sparkly gold braid around his shoes.

He has developed in a direction very far form the first concept.
Next job is to make him able to clip onto the Playboard, and extend down with a sturdy handle to pick him up with and perform him.

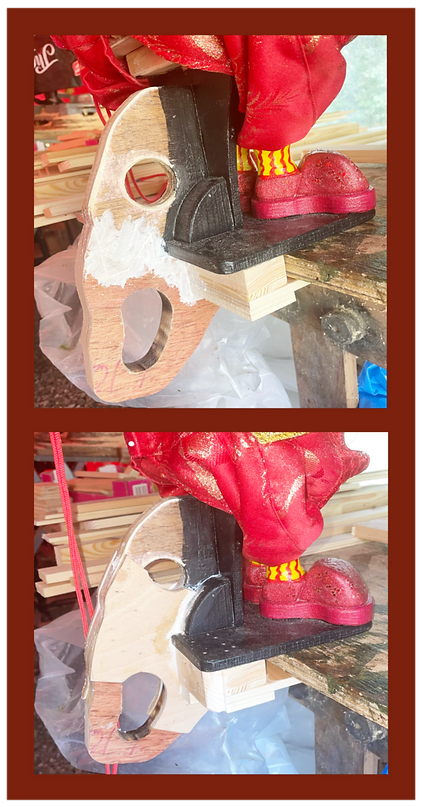
A quick lick of black paint to his stand and handle, and a paint job on the Toucan - and he is done !


