


Saint WIGSTAN

Made for a Town Council Fun-Day event in Leicestershire where every year they celebrate their own local Patron Saint :
St. WIGSTAN.
But he would do just as well in any 'Game of Thrones' type capacity.

My original plan was to use an unfinished wooden head of the poet Keats that I had given up on finishing years ago.
With this in mind, I roughed out a basic sketch.
This let me know what sort of fabrics to use for the costume.
As he was being built 'cheap and fast' I vowed to use only remnants in my fabric bins.

I was lucky, there was a nice selection of interesting looking brown-ish fabrics that seemed to work well together.
There was enough of the small brown squared fabric to line the inside of the puppets glove body too.
The inside of any character is as important to me as the outside.
Colour coding the lining helps to identify puppets easily when putting them on in a fast moving show.

I also found a nice selection of vaguely Celtic looking brooches
in my admittedly extensive stash of Charity-Shop jewelry.


All Change ! ... I found a different unused wooden head that I felt had more character potential.

Also changed my mind on which fabric to use for his tabard.
What was originally going to be the cloak, became the tabard instead.


No point building a complete shirt. Only the colar section will be seen.
Just making the parts that will actually be visible.

His head is not yet fixed to the body.
But I find it useful to pin the costume parts onto him to gauge how the build is doing.
Having him temporarily pinned together helps me plan what to do next.


Paper Mache Pulp will be sculpted over these simple armatures and cardboard shapes or 'formers'.
I had decided he really needed wolfs head as part of his fur cloak.
So with the crown, shield and sword - that's a lot of props to make.


As always with pulp, it is so much easier to build it up in layers.
Each layer when dried out makes a nice firm base for sculpting the next onto.
It would be really hard to build complex shapes in just one layer.
Sheild and handle built separately over individual cardboard formers.

Soft pulp bonds really strongly with dried pulp. Forming a kind od paper pulp 'weld'. I know these joints will absolutely be strong enough.

Pulp also bonds really strongly with all kinds of wood.
That is because mine contains PVA wood glue.
So it is perfect to build out the missing back of this puppet head.


Certain props, like this hand and sword are achieved by a mix of plywood and pulp combination.
Flat shapes are faster to make in plywood.
Pulp addition gives the shape texture.


Each layer of pulp allows for more fine detail.
His hair and sword hand progressing nicely.
For the decorative edge of the shield, I glued on some dressing gown cord.
I don't make things easy, I could have just painted on a dragon.
3-D dragon sculpt does look better than just painting one on.

To gauge how the build is going I first cable tied the arms onto the body before pinning bits ought costume on top. Looking good so far.

Finally getting all the parts joined up ! Because of the weight of the sword and shield props, the arm support structures had to be pretty hefty and strong.
After all, it's only my little fingers holding them up and making them move about.

St.Wigstans cloak turned out to be a very complex asymmetrical pattern.

After all that sculpting it is nice to finally be painting.

First Mr Wolf, then old St. Wigston himself.


Now that he is painted, all the pre made costume parts can be sewn onto his body.

But first a little bit of body padding to give him a nice shape.

Assembling the costume layer by layer.


A slight pulp repair to the crown.
Then covering the costume with a protective layer of cling-film while the shield is painted...
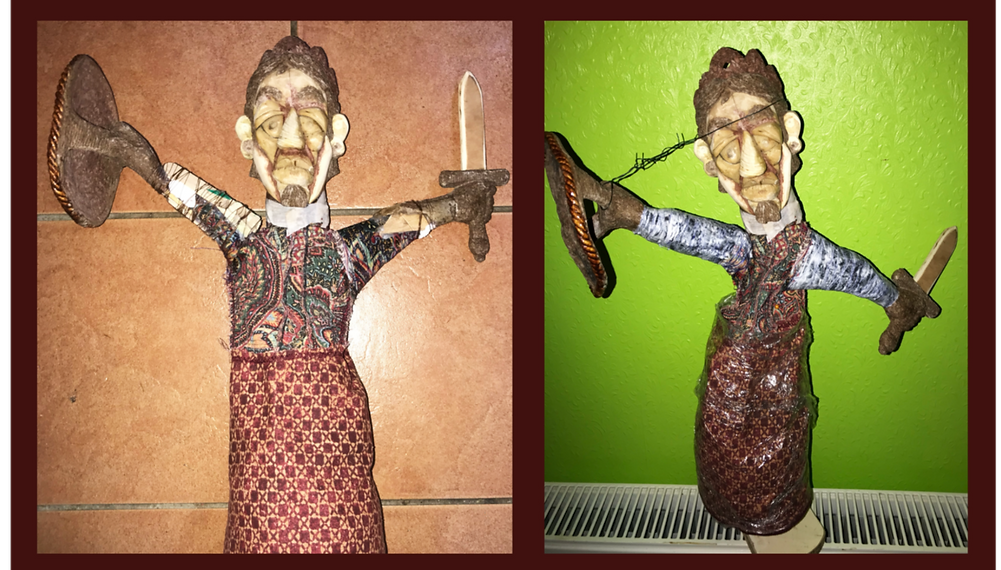
... And he is DONE !


